Welcome aboard to my Fall '10 blog for FSU's DIG3725: Game Design course. Feel free to browse what I find along the
way and please leave comments!

Critques, suggestions, and questions are always appricated!

Thursday, September 16, 2010

Blender Homework 5: Game Logic Reloaded!


This video shows just a quick demo of what I attempted in Blender with tracking and groups. The bullets are supposed to act as a group twords the red target which they are all tracking. Unfortunately there is still a logic problem I couldn't figure out with why the target wouldn't fall. All the tutorials I've been mentioned setting the target object as "Dynamic" and "Actor" but even after that it still is giving be problems right now. I'll keep working on it though and hopefully I can figure out more of the logic commands for the next video, stay posted because I'll definately post tips if I find out! ;)

Hot Keys:
---------
  • control [up arrow] => fullscreen
  • middle mouse button => rotate screen
  • n => transform properties box
    >>> to center enter 0 [tab],0 [tab],0 [tab] in the top left box for the object
  • shift & d => duplicate
  • a => select/deselect all objects


  • Tips:
    -----
    Tip 1: when selecting multiple objects hit shift after the first item has been selected to avoid unwanted acciential selections.

    Tip 2: How to find object names:

    Since the "Edit Object" Accuator needs the object name, if you don't know
    the name, click on the second layer where the star is, right click the star,
    go to the edit tab near panels(the square with four dots), then look under the
    "Link and Materials" tab, next to OB: is the name of the selected object.


    Helpful Videos:
    ---------------

    1.) Intro to Properties, Duplicating Objects, and Fullscreen View
    Note: (hot keys mentioned in this video are listed in the top "Hot Keys" section of this post.

    2.) How to Create a Basic Working Firearm in Blender

    3.) Camera Tracking


    Command List:
    -------------


    Creating objects:
    --------------------------

    Creating a star particle shape:

    1.) TAB[for edit mode] >> e[for extrude] & mouse scroll

    Creating the "gun"

    1.) spacebar >> add >> mesh >> cube
    2.) resize into a rectangular box form with the size commands:

    s => size
    sx => size x-axis
    sy => size y-axis
    sz => size z-axis

    3.) move the star particle into layer 2

    m >> click the second box >> ok

    Creating Logic:
    ---------------

    1.) select "gun" (the rectangle)
    2.) go to the logic panel (pacman button)
    3.) select the following options:

  • a.) Static [default]
  • b.) Actor [should be clicked, appears gray when selected]
  • *c.) Sensor Tab >> Add
  • *d.) Controller Tab >> Add
  • *e.) Actuator Tab >> Add

    *Note: For these options under the logic window, a small area of
    options should pop up after clicking add for each.

  • &f.) connect the controller to the sensor
  • &g.) connect the actuator to the controller

    &Note2: There are small yellow dots you can see near each section,
    just click near one and drag to another. : )

  • h.) Sensor Tab >> select Keyboard, click key, press spacebar
  • i.) Actuator Tab >> Edit Object

    The object is the star which is on layer 2.
    In this case, my star's name is "Cube" since it was transformed from a cube originally.

  • j.) select gun >> Logic Button >> Actuator Tab >> OB:Cube
  • k.) go to layer 2 >> select star >> create the following logic for the star:

    >>> i.) Dynamic, Actor, Bounds >> Sphere
    >>> ii.) add sensor, controller, & actuator
    >>> iii.) connect links
    >>> iv.) Actuator Tab >> LinV >> [click L so it is darkened]
    >>> v.) go to the front view >> Actuator Tab >> Lin v >> 38.00 on x(left most box)

    4.) select both layers [Shift & select layers] >> p [shows action]

    Please see the screen shot below this textbox for how the logic for the gun should look if you are getting lost. There's also a screenshot of finding object names. ;)


  • Friday, September 10, 2010

    Homework 4: Concept Design! Let's get the wheels rolling!


    Essential game experience:

    The overall goal of Team 1's game is to experience the feeling to transforming and utilizing various skills to persevere towards a goal which requires constant innovating skill.


    Storyline Summary:

    Background:
    Deeply hidden within sector 21 a mysterious lab experiment zaps into being from a series of failed experiment texts. Unknown to the team of scientists what they have created, the first AI in existence, mutated from a concoction known only by most dastardly of villains.

    Our main character, insanity driven from mad scientists' experiments fights through stages to get escape from his even more delusional counterparts by learning about his oddly forms skills and transforming to escape from the ever driven army of angry scientists who are prepared to throw everything and the kitchen sink to capture their newly formed minion.

    Gameplay:

    Our main character travels through a newly found terrain by controling it's three forms(described below), which all must be widely used to escape from the level. Each level is completed by reaching further from the lab to a more free area but each level causes the character to think differently, using the character for every advantage possible to open a final opening to freedom!


    Characters:

    Character 1: created in a lab with the quest to escape to find his Mom(possibly the swirly looking character in the second image on the right?) and escape from his less than friendly scientists. It has three states but overall, the main character could be described as blob-like, molecule-like, oddly shaped, mutated, slightly human-like, and mystical with powers.

    I made some quick sketches of the concept of what our main character. These are really rough but I wanted to throw out a lot of ideas and see what we come up with before making anything too detailed. Overall my group is trying to minimize the complexity of the characters for overall efficiency of the game and so we can focus more time on the game play design. ;)

    These are three concept pages with a few ideas for each character. Tentatively my group has one main character which transforms into different states with different characteristics. All three are needed in order to complete the game. We are also considering making a side character but I haven't made any art for him/her yet.

    *** Click to get a better view of each thumbnail! ***

    State 1: Float
    1.) white: low health, gasesous form, two versions, 1.) small center, spacious
    or large light form

    - ability: floats (bounces?)

    State 2: Normal
    2.) grey: normal health, normal size

    - ability: controls objects

    State 3: Heavy/Force
    A more detailed concept sketch for the heavy type. -->

    3.) black: high health, low speed, 2 versions: small & dense or large & heavy

    - ability: rolls, affects platforms with force


    Character 2: The second possible character is a subcharacter to help the main character with tips of how to get through levels. We had two ideas for this so far:

    - a good scientist: skinny & tall but with good motives to help the main character escape because he does not agree with the other scientists' methods and wants him to escape

    - a small helper: something that hovers near the main character to give them helpful tips, we are still debating the concept for this one if we decide to go with it. It would possibly be a molecule or blob of some kind.

    Thursday, September 9, 2010

    Blender Homework 3: Blender Game Engine -- Ready, Set, GO!


    This video in case the audio is too horrible again is basically about testing out the Blender physics engine. For anyone new to Blender, the Blender physics engine is basically the built-in system for controling your objects with certain constraints. For example, as a demo this video shows a bowling alley knocking pins over. I haven't completely figured out the game engine completely but this is my first test run of it where the ball actually hits some of the pins. The pin in front and two others fall into the plane a little, I messed around with the mass of the plane but that didn't really have any effect on that problem.

    If you'd like to try something like this out feel free to refer to my command notes!

    Command Notes


    Blender Homework 2 Notes:

    Intro on Blender Game Engine
    ____________________________

    Manipulate created objects with this built-in function
    of Blender, done though the creation of logic commands.

    sensors: responds from external input(ex. keyboard A-S-W-D keys)

    controllers: use sensory information

    actuators: decide what should be done if something is reached
    (can be improved with a python script)

    AND/OR <-- similar to programming, these are commonly used when
    using the Blender Game Engine, and means all things must be true,
    or means any 1 thing must be true for something to happen.


    Commands Overview:
    ------------------

    1.) create or use objects, if you just want to try a basic shape,

    spacebar >> Add >> Mesh >> plane

    2.) move objects to an easily viewable location with:

    g [grab] view >> [view type, ex.) top]
    gx [grab on x axis]
    gy [grab on y axis] or
    gz [grab on z axis]

    Tip 4: Having trouble viewing your objects? Try ALT & left click & moving the mouse
    to get a better view.

    3.) resize the plane

    s [size]
    sx [size x]
    sy [size y]
    sz [size z]

    (I'm creating a bowling alley so mine is rectangle shaped)

    4.) creating the pins

    spacebar >> Add >> Mesh >> cube

    [resize with g commands]

    [edit mode] >> Mesh >> edges >> bevel & move mouse slowly

    Shift-d [duplicate]

    [move pins in place with g commands]

    5.) Adding the ball

    spacebar >> Add >> Mesh >> UVsphere

    Material >> [choose color]

    6.) Adding Motion!

    Pacman shape(next to panels)

    Adding Sensors:

    "Sensors" tab >> Add >> choose Keyboard >> name W
    >> Key >> W

    Adding Controllers:

    "Controllers" tab >> Add >> AND >> [connect the link]

    Add Motion:

    "Actuators" tab >> Add >> [x direction = 0.2] >> [connect link]

    For a better look at how things should be set up click on screenshot below this textbox. : )

    7.) To test this, pressing p then w to move in the x direction.
    (if something works you're on the right track! ^_^)

    8.) Continue to to the same thing as step 6 wiht

    9.) Gravity!

    Make sure "Actor" is on and in this case I choose "Dynamic" since I don't want the object to spin.

    Materials sphere >> World Sphere >> Mist/Stars/Physics Tab
    >> Grav [enter gravity]


    Thursday, September 2, 2010

    Blender Homework 2: Basic Terrain and Character Design!


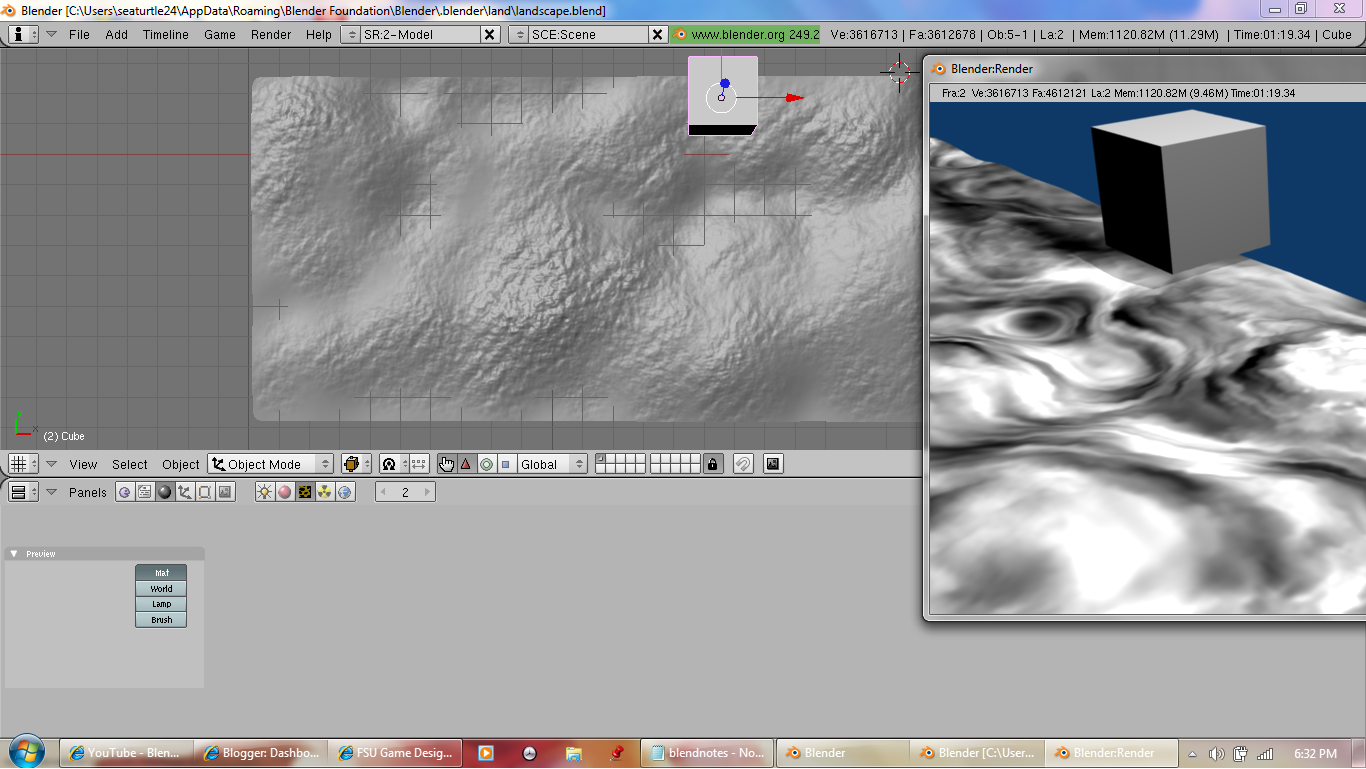
    The video above just shows an example of how I did texturing for my landscape using brush painting in "Sculpt Mode." I was following the tutorial for creating textured terrains here if you'd like to learn more. The video is part of a two part series and runs a little long so I'll be posting just the basic commands of what I used to create what I came up with in Blender. Please see below for the quick command list if you'd like to create something like this!


    This is a quick first render of my terrain, unfortunately my computer crashed(multiple times) after I went back to object mode and after that it was hard to even get it to show the render(it took about 5-10 minutes to give the rendered image).


    Tip 1: If you have a slow computer like mine, a graphics card might help when using Blender.


    This is the final version's screenshot. I was having a little trouble figuring out the camera so the render is better on the first screenshot but this one has more work done. It is supposed to be a house on a hill of sand. I created a sword for the object in another Blender file but I accidentally got into animation mode and told it to save the file but later when I checked there was no file. Ah well, that just proves, save and save a lot! Also control z(undo) is your friend with Blender!

    Tip 2: Save Blender files often to avoid losing them!
    Tip 3: Use control-z to undo the last action.


    Quick Command List:
    ----------------------------------
    These are the commands for the terrain only, not the house.

    1.) type x >> erase selected object
    2.) spacebar(opens the default "add" menu)
  • Add >> Mesh >> Plane
    3.) s [scale]
    4.) w >> subdivide multi [20 cuts]
    5.) sx [scale x-axis] <-- used to spread out the plane
    6.) sy [scale y-axis] <-- ""
    7.) edge select mode [line square button near picture & triangle]
  • alt & shift + select vertical lines(right click)
    8.) control z [undo] <-- if you clicked the wrong line
    9.) subdivide to get squares
    10.) tab [object mode <--> edit mode]
    11.) panels >> sphere tool for shading
    12.) pink sphere tool [materials] >> add new
    13.) square button next to pink sphere button [texture]
  • >> add new >> texture type [clouds]
  • >> colors >> colorband >> raise a to max [under small color window]
  • >> grab right side of the bar >> change color to white
  • >> raise contrast >> textures tab >> name brush1
    14.) sculpt mode >> edit [paper with 4 dots]
  • >> add multires >> add a level >> add a few more levels
    15.) Top view [numpad 7]
    16.) sculpt tab >> texture tab >> click empty box >>
  • add new >> click your brush name, brush1
    17.) increase strength >> paint with brush
    18.) texture tab >> default
    19.) sculpt tab >> raise size <-- to raise up the terrain
    20.) sculpt tab >> shape >> sub <-- creates valleys
    21.) resize brush smaller
    22.) object mode
    23.) multires tab >> decrease levels
    24.) space >> mesh >> cube

    Estimated working time: 4 hours, 30 minutes(about half of that was waiting for my computer to catch up)

  • Wednesday, August 25, 2010

    Homework 1


    Screencast 1: Brainstorming!


    This is here mostly as a screencasting test so I decided to do it on game genre types just to get some ideas of what is out there already, it isn't a full list but just some examples. I apologize for the horrible video and audio quality on this, I really need to buy a headset and camera for my laptop, the audio quality comes across better with headphones. You can check out the page I was viewing here. The overview of game types I mentioned were: Action, Shooter, Action-adenture, Adventure, Role-Playing(RP/RPG), Simulation, Strategy, Vehicle Simulation, Music, Dancing, and MORPG(Massively online role playing games).


    Books I'm currently using:

    - Digital Character Development: Theory and Practice
    - Rob O'Neill
    - ISBN-13: 978-0123725615

    My Rating: *****
    Info: Do you love game design but know nothing about it? This book is a great place to start for background information on games and animation. If you are looking for a book on coding I wouldn't suggest this one, it is general information about game, animation, and character design.


    What Drives You?

    I started getting into video games in 5th grade starting with Final Fantasy 8. My favorite video games genres are role-playing(Final Fantasy, Chrono Trigger, Kingdom Hearts, Wild Arms, Super Smash Brothers Melee, ...) and strategy games(Fire Emblem ,Yugioh Duelest of the Roses, ...).

    Some of the top things I love in games are: interesting characters, original and semi-random gameplay, and overall probably most importantly innovative game concepts which keep the player wanting more even after the game is finished. Games which have enough character development and storyline to make a highly rated movie also add to the presence of future gameplay through the connections built in what is sometimes called a "lean back" experience such as watching the movie Final Fantasy VII: Advent Children(see right image).