
Hi everyone, these are some of the tutorials I tried out to get a little more familiar with modeling and the main uses for the tutorials.
V------V------V------V------V------V------V------V------V------V------V------V------V------V------V------V------V------V------V------V------V------V
-----------------------------------------------------------------------------------------------------------------------------------------------------------------------------------
Description: The most basic tutorial on modeling I could find. This one creates three objects, adds a solid color, manages basic lighting, and basic planes as backdrops.
Skill Level: Complete Beginner
Rating: *****
-----------------------------------------------------------------------------------------------------------------------------------------------------------------------------
My version preview: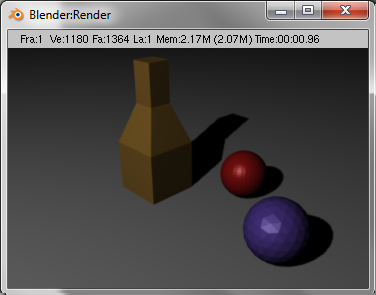
Important Tips from this tutorial:
Hot Keys:
Moving the Screen's View:
Shift & middle mouse => Moves the screen
Alt & middle mouse => rotates screen
middle mouse => zoom on main window or moves sub-windows in the panels area
Selecting & Deselecting Objects:
[ objects have a pink halo when selected and no outline when unselected]
A => select/deselect all objects
Shift & right click => select/deselect multiple objects
Screen View Numpad:
0 => Camera View
1 => Front View
3 => Side View
7 => Top View
Key Commands List:
1.) create three objects, two spheres and one cube( Add >> Mesh >> "Object Type")
2.) Tab (go to Edit mode)
3.) A (unselect all)
4.) B & left click over area (select a surface of the cube)
5.) E (extrude) >> region
6.) F5 >> Material >> Add new >> add color
7.) F10 >> Format >> SizeX: 360, SizeY: 240 (Resizes the rendering window)
8.) Numpad 7 (Top view) <--- gives a good view for lights and cameras
9.) View your objects in camera mode(Numpad 0) and fit objects within the second dashed line. Move lamps and lights as needed to created a better rendered view.
10.) To avoid "hovering" objects in renders, create a plane (Add >> Mesh >> Plane) and move it below the objects but make sure the objects are touching the plane since it's not too common that we find spheres 2 inches above a table right?
11.) Continue to adjust the objects, plane, and lamps/lights to create a well lighted, non-hovering final image in the rendered view!
12.) Congratulations, you have completed your first modeled objects!
Important! => Anything outside of the second dashed rectangle in camera view is not shown in a rendered view! Check the camera view before rendering!
----------------------------------------------------------------------------------------------------------------------------------------------------------------------------
Skill Level: Complete Beginner
Rating: *****
-----------------------------------------------------------------------------------------------------------------------------------------------------------------------------
My version preview:

Important Tips from this tutorial:
Hot Keys:
Moving the Screen's View:
Shift & middle mouse => Moves the screen
Alt & middle mouse => rotates screen
middle mouse => zoom on main window or moves sub-windows in the panels area
Selecting & Deselecting Objects:
[ objects have a pink halo when selected and no outline when unselected]
A => select/deselect all objects
Shift & right click => select/deselect multiple objects
Screen View Numpad:
0 => Camera View
1 => Front View
3 => Side View
7 => Top View
Key Commands List:
1.) create three objects, two spheres and one cube( Add >> Mesh >> "Object Type")
2.) Tab (go to Edit mode)
3.) A (unselect all)
4.) B & left click over area (select a surface of the cube)
5.) E (extrude) >> region
6.) F5 >> Material >> Add new >> add color
7.) F10 >> Format >> SizeX: 360, SizeY: 240 (Resizes the rendering window)
8.) Numpad 7 (Top view) <--- gives a good view for lights and cameras
9.) View your objects in camera mode(Numpad 0) and fit objects within the second dashed line. Move lamps and lights as needed to created a better rendered view.
10.) To avoid "hovering" objects in renders, create a plane (Add >> Mesh >> Plane) and move it below the objects but make sure the objects are touching the plane since it's not too common that we find spheres 2 inches above a table right?
11.) Continue to adjust the objects, plane, and lamps/lights to create a well lighted, non-hovering final image in the rendered view!
12.) Congratulations, you have completed your first modeled objects!
Important! => Anything outside of the second dashed rectangle in camera view is not shown in a rendered view! Check the camera view before rendering!
----------------------------------------------------------------------------------------------------------------------------------------------------------------------------
V------V------V------V------V------V------V------V------V------V------V------V------V------V------V------V------V------V------V------V------V------V
-----------------------------------------------------------------------------------------------------------------------------------------------------------------------------------
Description: A short tutorial on creating outlined objects for a cartoon effect in the game engine.
Skill Level: Beginner
Rating: *****
-----------------------------------------------------------------------------------------------------------------------------------------------------------------------------
Preview of the Effect from the tutorial:


standard view <---------------------------------------------> game engine view
-----------------------------------------------------------------------------------------------------------------------------------------------------------------------------
Important Tips from this tutorial:
1.) Creating this effect can be visually appealing but it also increases the polygon count of the game by twice as much when applied. This technique is useful only when used sparingly or with a high power system to run a game.
Key Commands List:
1.) With the default cube, Shift & d & click ( duplicate the object on top of itself)
2.) z (wireframe)
3.) s (scale up the cube a little)
4.) z (out of wireframe mode)
With the larger cube selected:
5.) F5(Shading Tab) >> Links & Pipeline Tab >> delete default material (with x next to material names) >> Add New Material >> Select a black color (any color can be used but will be partially black from shadows)
6.) Make sure all objects (the two cubes) are selected by pressing A (it should leave a pink halo when selected)
7.) W (specials menu) >> Flip Normals (turns faces inside out so they do not appear in the game engine)
8.) Viewport Shadings (The odd box shape next to the display box for what mode you are in) >> Texture mode
9.) p (play in the game engine to test)
Skill Level: Beginner
Rating: *****
-----------------------------------------------------------------------------------------------------------------------------------------------------------------------------
Preview of the Effect from the tutorial:


-----------------------------------------------------------------------------------------------------------------------------------------------------------------------------
Important Tips from this tutorial:
1.) Creating this effect can be visually appealing but it also increases the polygon count of the game by twice as much when applied. This technique is useful only when used sparingly or with a high power system to run a game.
Key Commands List:
1.) With the default cube, Shift & d & click ( duplicate the object on top of itself)
2.) z (wireframe)
3.) s (scale up the cube a little)
4.) z (out of wireframe mode)
With the larger cube selected:
5.) F5(Shading Tab) >> Links & Pipeline Tab >> delete default material (with x next to material names) >> Add New Material >> Select a black color (any color can be used but will be partially black from shadows)
6.) Make sure all objects (the two cubes) are selected by pressing A (it should leave a pink halo when selected)
7.) W (specials menu) >> Flip Normals (turns faces inside out so they do not appear in the game engine)
8.) Viewport Shadings (The odd box shape next to the display box for what mode you are in) >> Texture mode
9.) p (play in the game engine to test)
V------V------V------V------V------V------V------V------V------V------V------V------V------V------V------V------V------V------V------V------V------V
-----------------------------------------------------------------------------------------------------------------------------------------------------------------------------------
Description: This tutorial is a put together collection of how I have been creating the characters for Team 1's game in Blender. It includes adding a background reference image and the basics of modeling a character without textures or character rigs applied.
Skill Level: Intermediate
Rating: ??? <-- Feel free to rate this tutorial in the comments!
-----------------------------------------------------------------------------------------------------------------------------------------------------------------------------
Preview of the Effect from the tutorial:
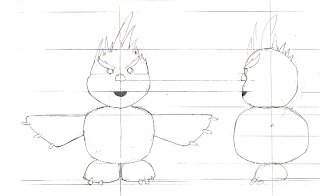

Blueprint Image ----------------------------------------> Blender Background Image Reference
-----------------------------------------------------------------------------------------------------------------------------------------------------------------------------
Important Tips from this tutorial:
Key Commands List:
Skill Level: Intermediate
Rating: ??? <-- Feel free to rate this tutorial in the comments!
-----------------------------------------------------------------------------------------------------------------------------------------------------------------------------
Preview of the Effect from the tutorial:


-----------------------------------------------------------------------------------------------------------------------------------------------------------------------------
Important Tips from this tutorial:
Key Commands List:
No comments:
Post a Comment